Meet Drupal 7
Welcome to a Faster, more Elegant and much more User Friendly CMS. Drupal is a popular open source Content Management System (CMS) written in PHP and backed by a very large group of developers. The CMS comes in a variety of distributions that can help you fast track most web development projects.
What’s New in Drupal 7
New Minimum System Requirements
Database: MySQL 5.0.15 or PostgreSQL 8.3
PHP Version 5.2 or higher
PHP Memory: 40M – 64M
Please read the complete list of requirements
Improved Security
More secure password and login system, the cron implementation (scheduled tasks ) has also been modified.
Easier Installation and Administration
The installation process and the administrative experience have been simplified greatly. Drupal is now a lot more interactive and offers more intuitive controls/shortcuts providing quicker access to important activities.
Speed and scalability
Drupal is now capable of handling larger amounts of traffic with improved caching and better CSS and JavaScript optimization. The overall responsiveness of Drupal 7 is remarkable compared to previous version.
Increased Flexibility out-of-the-box
The developers have integrated many of the top used modules from Drupal 6 into Drupal 7. Modules like CCK and Views which makes Drupal the force it is are now available from installation. Modules can now be updated via the web.
Nicer Themes
The Theming Layer has been improved greatly. Theme Designers now have more controls that will greatly speed up theme development and allow them to take full control over the entire look and feel of the website.
Installing Drupal 7 from scratch…
Download
Goto Drupal.org and get a copy of the latest Recommended releases of Drupal 7.
Upload file to Web Server
- Login to your webserver or use your favourite ftp client to upload your compressed .tar.gz or .zip file to the
www directory. - Decompress the file on the server. (use unzip <filename> OR tar -xvf <filename> from terminal to
unzip). - Rename the folder from its current name: “Drupal-7.x” to your desired name. (note: site will be accessed at
http://yourserver/drupal-folder-name).
Note: If your developing locally with WAMP, extract the archive into your www folder. (c:wampwww)
Create the configuration file and grant permissions
In order to set up your new site, it is
necessary to be able to modify the settings.php file via your browser. By default only the default.settings.php file
exists and the permissions are set to Read Only.
You will need to copy this file, rename it to settings.php,
and then temporarily change the permissions so that the server can Read and Write to this file when a user makes
changes via a web browser. Navigate to folder from terminal and run chmod -R 755 settings.php
You now
need to change the permission on the sites/default folder(chmod -R 755 /), as this is the place where files
created or uploaded via the web interface will be stored.
Setting up the Database
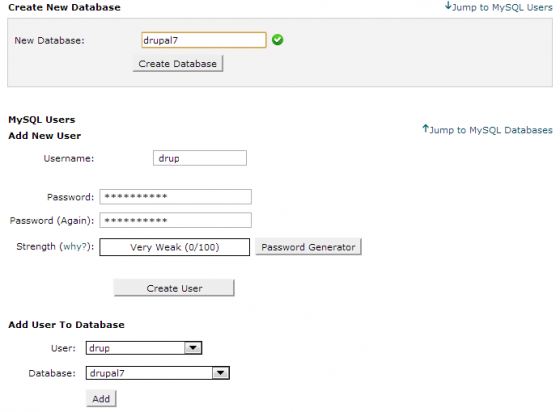
- From your Cpanel, open MySQL Databases.
- In the Create new database field, type the name you want to use for your new Drupal database and then click
Create. - Scroll down to Add New User.
- In the User name field, type the username that you want to add (this will be the username for site to access
the database, not your own username).
- In the Password and Re-type fields, type a password to use for the new user. Click Create User.
- Finally, go to the Add user to Database section and select from the dropdown list the user and the database
which you have just created. Click Add then check “Grant all privileges” on the database. - That’s it, we are now ready to start the installation.
Run the installation Script
To begin the installation open your web browser and navigate to http://your-web-server.com/drupal7 (for this tutorial the directory was renamed to drupal7).
Join the Newsletter
Sign up for our personalized daily newsletter


