Installing WordPress on a PC
Running WordPress Locally…(Setup guide for hosting your own WordPress website from a PC). WordPress is one of the most popular opensource blogging and content management systems (CMS) available on the internet. It is PHP/MySQL based, very easy to theme and has support for enhancements through plugins which can be downloaded directly from http://wordpress.org. There are over 30,000 contributed plugins and themes available.
Why Setup Locally..?
WordPress like all other PHP based apps requires a server (apache server) to run. Remember, PHP is server side language unlke Javascript which runs on the client-side via a web browser. It is very convenient to setup wordpress on your computer to test or establish a development environment but in order to do so you will need a lite-weight software called WAMP.
Turn you PC into a Server with WAMP
WAMP is an acronym for Windows, Apache (an HTTP Server), MySQL (popular open source database) and PHP (a server-side programming platform). These are industrial-strength, open-source software that collectively can be used to develop, deploy and run web applications. Depending on the operating system, there is:
- WAMP: Windows-Apache-MySQL-PHP
- LAMP: Linux-Apache-MySQL-PHP
- MAMP: Mac-Apache-MySQL-PHP
Download
Browse to http://www.wampserver.com/en/#download-wrapper and get yourself a copy of WAMP. You will have the option to choose wither a 32 or 64-bit environment depending upon your computer’s configuration. In addition to Apache, PHP and MySQL WAMP includes phpMyAdmin to better help you manage your databases through web based GUI rather than having to use a terminal interface.
Installation
After your download has completed, Run the installer and leave all the default options (you may customize the settings if you wish). Once the installation has completed you will be asked to choose your default browser. Firefox or Chrome is a great choice since both support tons of developer tools like firebug and web developer toolbar.
NB – if your Firewall pops up at any point make sure to grant Apache access.
Local Server Test
Look for the wamp server icon in the tray, if its not there goto
Start –> All Programs –> WampServer –> start WampServer.
If the tray icon is not green then you will need to click on it and select “Start All services”.
Once the WAMP services are up and runing, direct your browser to http://localhost/.
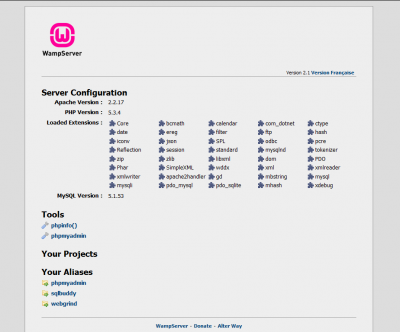
If your screen resembles the following then everything is working!

WordPress Setup
Now that we have WAMP up and running, the first thing you need to do is get yourself a copy of the latest version of WordPress. (http://wordpress.org/latest.zip)
Once the download is complete, extract the archive and place it inside the www folder under WAMP This can be found at C:\wamp\www\. (in this example the folder is named wordpress but you may name yours according to the name of your website or blog.)
NB. If you want this WordPress installation to be done on a shared hosting server (eg. godaddy), the files should be uploaded to the public_html folder of your account.
Next, Open the browser and navigate to http://localhost/wordpress. If you had named your wordpress folder something else please adjust the url accordingly (http://localhost.com/

Creating a Database in WAMP
Wordpress requires a database to store important information like user accounts, pages and posts. To create a MySQL database in WAMP, open a new tab (CTRL + T) and browse to http://localhost/phpmyadmin, here you should see a field requesting the database name but just in case you don’t see it click on the Databases manu link.
Insert the database name into the create new database field and click create. Now we need to add a database user, to do this go to the Privileges page by clicking on the menu item. Ensure that your database user has full rights over the database created earlier.
Once your database is created, go back to the WordPress Installation tab, insert the database info (default username is root and password is ) and hit the Let’s go! button.
Enter the details for your newly created MySQL database and press the Sumbit button

Creating Admin User
On the next screen you will be required to specify information for setting up an administrator for your new website/blog. In addition to this, you can specify whether you’d want search engines to index your site or not. Once you fill in that information, press the Install WordPress button to proceed.

All Done!
Your have successfully installed WordPress. You can use the Login In button to access the administrative backend and start posting in your new site.
Join the Newsletter
Sign up for our personalized daily newsletter


