Creating a Name Generator using PHP and MySql

Hi Koders!
The first thing I would like to begin with is what are Php and MySQL?
PHP is a server side scripting language. that is used to develop Static websites or Dynamic websites or Web applications.
MySQL is a relational database management system based on SQL – Structured Query Language.
Prerequisites:
- Text Editor – I’m using Visual Studio Code.
- Intermediate knowledge of HTML and CSS.
- Intermediate knowledge about web servers.
- A cup of coffee (this one is optional, but helps a lot XD).
Making a MySQL database
The first thing we’ll start with is making a database of names to be used by the name generator.
You can do this by navigating to the PhpMyAdmin page for your web server, which is located at [your domain]/phpmyadmin by default.
An example being localhost/phpmyadmin or http://yourwebsite.com/phpmyadmin
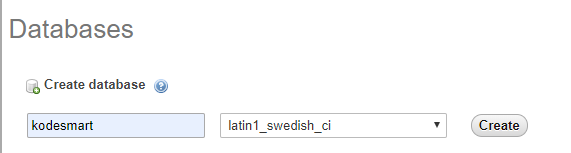
Making a Database
Now that we’re on the PhpMyAdmin page, we can start by clicking New and entering the name of our database. Click Create to save your database.

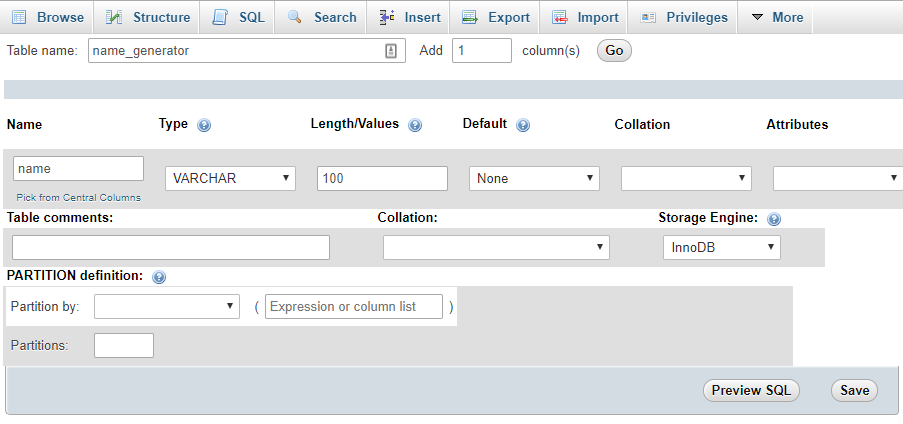
Making a Table
Next, we’ll create a table for our database. Simply add a name and the number of columns(only 1 column is needed for our name generator), click Go to move to the next step.

Define the name and type of our table’s column. Our name generator will only need a single column of names. I’m using VARCHAR set to 100 characters max per row to store each name. Click Save to finally save your table.
Inserting data into a table.
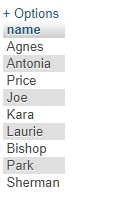
Insert a few rows of sample data for your name generator. Here I’m adding 9 names to the table by running the following query.
INSERT INTO ‘name_generator’(‘name’) VALUES (‘agnes’),(‘Antonia’),(‘Price’),(‘Joe’),(‘Kara’),(‘Laurie’),(‘Bishop’),(‘Park’),(‘Sherman’);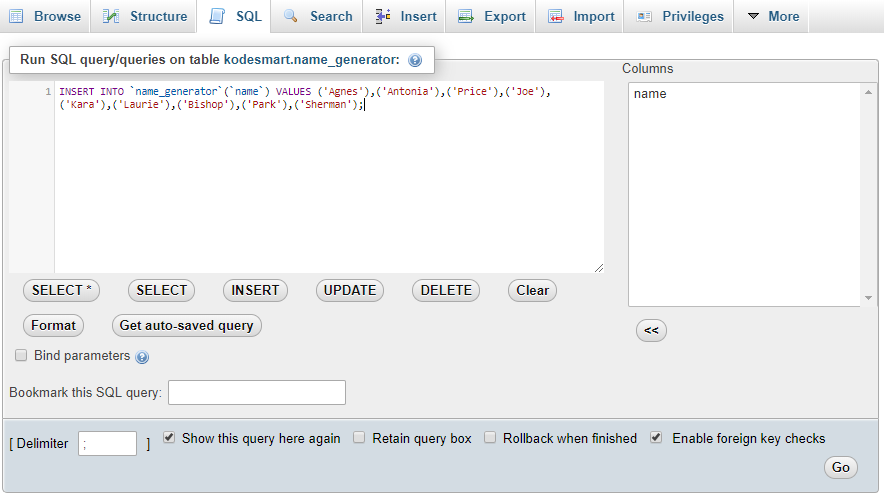
The resulting table should look like the following image.
Creating the Name Generator
Now that we have a working MySQL database, all that is left to do is write a php script on a webpage that will use the database for generating random names.
We’ll create 2 files and 1 directory, index.php which will be the webpage used for generating random names and styles.css to apply a few colors and formatting to our webpage. Create a new directory and name it css, place the styles.css file inside this directory.
The result should look like the following image.
Base Directory.

Inside the CSS Directory.

Writing the index.php webpage
Open the index.php file inside your favorite text editor, and we’ll begin writing the contents of the Name Generator webpage.
- First we’ll do a basic html markup, copy and paste the following text:
<!doctype html>
<html lang="en">
<head>
    <meta charset="utf-8">
    <title>Php Name Generator - Project 1</title>
    <meta name="description" content="Php Name Generator - Project 1">
    <meta name="author" content="MyCatGray">
    <link rel="stylesheet" href="css/styles.css?v=1.0">
</head>
<body>
</body>
</html>
- Between the body tags we’ll markup the webpage’s content and structure.
<div id="container">
        <h1>PHP and MySQL Name Generator</h1>
        <h2 id="random_name"></h2>
        <div>
        <form action="index.php"><input type="submit" value="Generate"></form>
        </div>
</div>
The first div is the main container for the content on the webpage, we’ll set this to a fixed width and height and center it horizontally and vertically on the page. Inside this container, we have the 3 lines of content, a title, the generated random name and finally a generate name button used to generate more names.
Styles.css, Making our webpage beautiful
We have a fully structured html webpage, however the container is not yet formatted and the webpage looks very bland. We’ll fix this with a few lines of css.
Open the styles.css file and copy and paste the following lines of code:
body{
    color: black;
    background: rgb(255,246,0);
    background: radial-gradient(circle, rgba(255,246,0,1) 0%, rgba(223,176,40,1) 100%);
}
#container{
    position: absolute;
    width: 500px;
    height: 300px;
    top: 50%;
    left: 50%;
    margin: -150px 0px 0px -250px;
    text-align: center;
}
#container input[type=submit]{
    width: 250px;
    height: 60px;
    color: white;
    background: rgb(40,85,223);
    background: linear-gradient(0deg, rgba(40,85,223,1) 0%, rgba(0,166,255,1) 50%);
    outline: none;
    border: none;
    border-radius: 20px;
    font-size: 1.9em;
    font-weight: bold;
    box-shadow: 0px 2px 5px black;
}
#container input[type=submit]:hover{
    cursor: pointer;
    background: rgb(25,53,140);
    background: linear-gradient(0deg, rgba(25,53,140,1) 0%, rgba(0,150,231,1) 50%);
}
#random_name{
    color: white;
    font-size: 52px;
    font-weight: bold;
    text-shadow: 0px 2px 3px black;
}
Php and MySQL script to connect and display randomly generated names
Now that we have a completed static webpage, lets add our php and mysql to connect to the database and display random names each time the page is loaded.
Open the index.php file and place the following text inside the head tag of the document.
$random_name = "";
$conn = mysqli_connect("localhost","user","","kodesmart");
if(!$conn){
	die("Connection Error!");
}
$query_random = "SELECT name FROM name_generator ORDER BY RAND() LIMIT 1";
$result = mysqli_query($conn,$query_random);
if(mysqli_num_rows($result) > 0){
	while($row = mysqli_fetch_assoc($result)){
		$random_name = $row["name"];
	}
}
mysqli_close($conn);
The <?php and ?> tags mark the opening and closing of php code inside the file. In Php variables are declared using the $ symbol as shown with the variable $random_name which was initialized to an empty string.
mysqli_connect is the function used to connect to our mysql database we created earlier, it accepts 4 parameters as shown below.
mysqli_connect(host,username,password,database);
After an attempt to connect, you should always check if the connection was successful by checking the connection variable like in the following snippet:
if(!$conn){
   die("Connection Error!");
}
Now that we have a connection to the MySQL database, we’ll need to write a MySQL script to get the data we want from the database. To get data from a database we’ll use Select as shown below:
SELECT table_column FROM table_name
$query_random = "SELECT name FROM name_generator ORDER BY RAND() LIMIT 1";
We can now run this query to the MySQL database using the php function mysqli_query, which takes in 2 parameters, the connection to the database and the query to be run. This function will also return the results.
Once we have the result from the query, a simple check is done to check if any data was returned. If a row of data was returned, then we use the mysqli_fetch_assoc function to gain access to the data through an assoc array which is then used to collect the randomly selected name from our query. This data is then placed inside out $random_name variable that we created before.
$result = mysqli_query($conn,$query_random);
if(mysqli_num_rows($result) > 0){
	while($row = mysqli_fetch_assoc($result)){
		$random_name = $row["name"];
	}
}
Finally, after you’re done using the database, always remember to close the connection.
mysqli_close($conn);
We have the randomly generated name inside our $random_name variable, all we need to do is echo this variable onto the page between our h2 tag with the id random_name to present this name to the viewer.
We can do this by making the following change to the index.php file. Copy and paste the following between the h2 tag with the id random_name.
The empty function takes in a string and returns true if the string is empty. The Echo function prints data to the page in a readable format.
<php if(!empty($random_name)){echo $random_name;} ?>
Open your page in your favorite web browser and enjoy! You have now made a working Name Generator using PHP and MySql. Thank you for reading!
Additional Exercises
– Add 2 names per randomly generated name.
Download Source: Link
Php_Name_Generator_Tutorial_source
Join the Newsletter
Sign up for our personalized daily newsletter
#1 GUIDE TO DRUPAL, WORDPRESS, CSS AND CUSTOM CODING | BEGINNER TO PRO